Anyway, I promised to get back to posting. But just to get something up quickly, here is an example video that my rehab facility asked me to produce for them. The is a demonstration of how I use my Toby tracker to assist me in my day to day life. The video is edited and as was provided to my rehab facility. Nonetheless, I think it does quite a good and detailed demonstration of how it works.

Showing posts with label autohotkey. Show all posts
Showing posts with label autohotkey. Show all posts
Wednesday, 6 May 2015
The awesome power of the Toby eye tracker
My apologies for having such a long radio silence. As you might've guessed, life is becoming a bit complicated and keeping me busy. I've also been wrapped up with a side project (which will be featured later, but you can see the early prototype at the beginning and end of the video) for using my voice bank.
Anyway, I promised to get back to posting. But just to get something up quickly, here is an example video that my rehab facility asked me to produce for them. The is a demonstration of how I use my Toby tracker to assist me in my day to day life. The video is edited and as was provided to my rehab facility. Nonetheless, I think it does quite a good and detailed demonstration of how it works.
Anyway, I promised to get back to posting. But just to get something up quickly, here is an example video that my rehab facility asked me to produce for them. The is a demonstration of how I use my Toby tracker to assist me in my day to day life. The video is edited and as was provided to my rehab facility. Nonetheless, I think it does quite a good and detailed demonstration of how it works.

Tuesday, 27 January 2015
Accessing the Power of Autohotkey through Voxcommando

 Back when I first mentioned voxcommando, I talked about how it can be used with autohotkey, but didn't provide an example. Honestly, I wasn't quite Happy with it for me to put public and I wanted to solve an example to do with pushing buttons in dialogue boxes. Now that I have it figured out… Here it is! :-)
Autohotkey and voxcommando example.zip
Yes, I know Python is integrated into voxcommando as a plug-in. So please don't jump on me for not using it. I chose to use autohotkey for two very specific reasons. First off, autohotkey is intended to emulated mouse and keyboard input. Which is exactly what I needed to achieve. In particular we need access to the Windows key button. Which I'm not sure can be easily achieved through Python. This is native and integral to autohotkey.
Secondly, which is a bit more off and aside. Autohotkey provides a hotstring and hotkey override/functionality. Which is particularly useful with a disability such as ALS. Because of this, I had developed a previous understanding of autohotkey.
Okay, about the example. Its core functionality is really quite simple. I create a command inside voxcommando, which is then used to execute a autohotkey scripts which passes in a command line parameter, such as "showdesktop". The command line parameter is then parsed out and the relevant bit of script is executed. Which in this case is to press Windows key and D (or in autohotkey language Send #{d} ).
In the example script, you will find examples for the snapping a window to the left, right and the four corners of your screen. Force rebooting your computer (don't worry it asks for confirmation first.) And how you can use autohotkey to pushing buttons in dialog boxes.(Eventually, I may expand it to do more. Right now it does just buttons)
 |
| I am told user account controls no longer provides much benefit. Make it less annoying by shutting it off |
What's that you say? It's a security feature? Yes it is. However, I discussed at length some of my computer programmer friends (who have much bigger brains than my own) that the security provided by user account controls is somewhat outdated and offer little benefit anymore. So would their assurances, I have turned mine off. (Don't worry. There is nothing compiled in the zip file. You can examine all the autohotkey scripts before using them).
Okay, I can get you thinking, "why is this a problem?" Well, in order for autohotkey to be able to send button commands to another dialog box. That Script needs to be run as an administrator, then the upgraded to do so, he has to come from another script.
Dont forget, if you want to give this script a try you need to install autohotkey from http://ahkscript.org/ other versions will likely not work.
Because autohotkey and voxcommando play so very well toghther, each get a thumbs up!

Tuesday, 16 December 2014
Voxcommando and the Blue Snowflake microphone

Obviously, one of the first things I did was install Dragon NaturallySpeaking for dictation. And one of the first things that became apparent, was the built-in microphone on my tablet… To state it politely… Sucks for dictation. It is however just fine for things like a Skype.
Secondly, one of the biggest things that I have found to be missing from the Dragon naturally speaking basic and premium is the ability to execute macros by voice. Sure, the premium edition (which is the one I have, version 11.5) allows you to create some custom commands. But these extend to being little more than pasting predefined text… So far other than items like your address, phone number and perhaps a few passwords… It is not terribly useful. You cannot tell it to do a set of predefined actions or anything more complicated. Above all, there is no way to use the Windows key through voice commands. This removes very basic, managerial functionality from my desktop and that it use all the time. Such as snapping a window to the left or right of the screen…
Sure, you can do this in the Dragon NaturallySpeaking Professional edition, but you need to be prepared to spend over $500 and the a programmer.
This brings us to:
The Blue Snowflake Microphone

I found it on Amazon.ca for about $50. It is small, compact and sits nicely on the top right-hand corner of my tablet. There are no drivers to install or manage. Just plug it in via USB and it works! It is advertised as providing a near professional sound recording quality. And though I have not tried it for that specifically. It works extremely well with Dragon NaturallySpeaking. Almost as well as a headset. I do have a few misrecognitions, but the frequency is such that it could be just the changes to my speech brought on by the wonderful ALS. When using it in a quiet environment, I have very few poor quality audio warnings.
Apparently, the microphone is somewhat directional as well. Which would obviously help with eliminating the background noise.
The one issue I have found is more to do with the tablet and anything else. It has a single USB port. Into which I have to run my eye tracker and the microphone, necessitating a hub. It would seem that the power supply from the tablet to the house is ever so slightly insufficient to power both (three if you count the hub) devices. The eye tracking seems to fail and reset a bit more frequently as opposed to when it is directly plugged into the tablet.
This could be a simple fix, I have yet to try it. But I may just have to find a different hub which has its own power supply.
Long story short, the blue snowflake microphone is a relatively inexpensive, and excellent upgrade to the system. The far superior to any other best top microphone I have used.
 Voxcommando

As mentioned above, Dragon NaturallySpeaking really is excellent for dictation but has a huge gap in what I would consider essential functionality for voice control over your computer. This gap is filled in beautifully by Voxcommando. In short, it allows you to the family easily set up predefined VoiceCommands which can be used to execute a macro on your system. It also comes with a whole bunch of predefined plug-ins which will also allow you to voice control your:
- Vera home automation system
- Hue lights
- iTunes
- XBMC (Both local and remote)
- Windows media Center
These are but a few of the default profiles it comes with. As you become more familiar with it though is a whole bunch more plug-ins you can modify and work with. All relatively easily.
As you know, I've been playing with home automation systems for some time. I've tried voice control through Siri proxy and raspberry pi, writing my own Windows speech recognition scripts and so forth to varying degrees of success. But right out-of-the-box, if you run Voxcommando in Vera or Hue mode. After a few minor settings like the IP address and generating XML (by pushing a button and voxcommando) you will have voice control over your environment. Which for me is huge! It is by far the easiest way to get voice control.
For me, I have found it works very nicely in conjunction with Dragon NaturallySpeaking. As a matter of fact, both programs are running right now I have Dragon actively dictating, with Voxcommando in standby mode. Where it passively listens but will not activate the command unless a prefix word is said first. So what I typically do, is I tell Dragon to "go to sleep" and then use my keywords followed by the command to activate voxcommando. Then, whenever you turn to dictation simply tell Dragon to "wake up".
As with anything, there is of course a bit of a learning curve. But, setting up the basic commands is extremely easy and the website provides some very good tutorials for getting started.
Voxcommando has lots of default Windows command you can work work to manage your environment. Including the Windows key. However, being the geek that I am and wanting to completely have dominion over my systems… It is very easy to marry up voxcommando with auto hotkey. This gives you complete control to do literally anything. Just to give you an idea, I've always found desktop real estate to be at a premium. Even more so on the tablet where screen space is limited. Using voxcommando with auto hotkey, it is very easy to create a script that will snap a window to say the top left of the screen. Rather than just the the left side.

The script for auto hotkey was also very easy to write. You could either write a whole bunch of one off the scripts that do specific things. But personally I found this to be cluttered and unpleasant to manage. I use a single script which is executed by voxcommando which passes in a command line parameter (e.g. SnapTopLeft) which is caught and then executed by auto hotkey.
If you use voice control for anything, or even want to give it a try. I highly recommend voxcommando. It is a free unrestricted trial, meaning all features are available but will require a restart after I believe 25 commands. If you want to buy it, it is only $40 Canadian which provides you with to license keys.

Tuesday, 25 June 2013
Raspberry pie versus Desktop
I know, I'm a bit overdue for a post. One of the reasons being is that I decided to try running a raspberry pie for my Siri proxy and have been occupied playing with that. Initially, I was just going to use the desktop that was arranged for me my friend. A Siri proxy is a great use for an old machine, and the one that was given to me was a beast in its day, grossly overpowered for my needs.
 As you saw in the previous post about setting up a home automation system, the setup was reasonably easy. It did however require that at first the Ubuntu machine has a keyboard mouse and monitor hooked up to it. Once this is all done, I could fairly easily use VNC to connect to it. From there I can use all my assistive technology to do the installation I need. But the initial setup was a bit cumbersome for this reason only. Without hands that works very well, the required manipulation of the keyboard and mouse was challenging. The other thing is that the old desktop, being is overpowered as it was generated a fair bit of heat and consequently had a number of fans and to keep cool. The machine was a bit noisy.
So, for a friends birthday we thought a raspberry pie would be a perfect gift for him and on a bit of an impulse (also some encouragement from my girlfriend) I decided to order one for myself as well knowing it could be used as a Siri proxy. After all, this is how siri proxy first came to my attention with Elvis impersonators raspberry pie garage door opener.
I did need to help to set up initial wiring and plugging the SD card. But once that was done, set up was actually far easier than with the desktop, and not just because I'd gone through the process previously. Out-of-the-box, once the pie is plugged in it boots up by itself (no power button) it is set up to network into it immediately. No need for a keyboard, mouse or even monitor. Simply use putty.exe to get started. The raspberry pie is dead quiet. There are no fans, nothing to make noise. As a matter of fact it requires only 5 V to run this the 700 MHz, credit card sized computer. Pretty impressive, especially for just US$40.

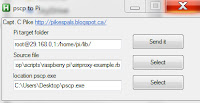 This script is just a convenient way to send a final from my Windows desktop to a raspberry. In order for to work you will need to have pscp.exe installed which of to download from the same place you downloaded PUTTY

So, for a friends birthday we thought a raspberry pie would be a perfect gift for him and on a bit of an impulse (also some encouragement from my girlfriend) I decided to order one for myself as well knowing it could be used as a Siri proxy. After all, this is how siri proxy first came to my attention with Elvis impersonators raspberry pie garage door opener.
I did need to help to set up initial wiring and plugging the SD card. But once that was done, set up was actually far easier than with the desktop, and not just because I'd gone through the process previously. Out-of-the-box, once the pie is plugged in it boots up by itself (no power button) it is set up to network into it immediately. No need for a keyboard, mouse or even monitor. Simply use putty.exe to get started. The raspberry pie is dead quiet. There are no fans, nothing to make noise. As a matter of fact it requires only 5 V to run this the 700 MHz, credit card sized computer. Pretty impressive, especially for just US$40.
Want to give it a try? Here's what you'll need…
I am presently running my pie headless (without monitor or keyboard) and am going to assume you're wanting to use the same here.We ordered everything from www.adafruit.com Here's the minimum parts that you will need to get started:

- A raspberry pi model B. US$40
- 5 V power adapter a micro USB cable. US$10
- SD card for Raspberry Pi preinstalled with Raspbian Wheezy US$15
- network cable.
And that's it! You can get a raspberry pi, Siri proxy server up and running for about US$65. I would however recommend also purchasing a case for it, it's always a good idea to protect and exposed circuit board. You can buy one for as little as US$10
I based this list on the starter pack listed on their website. I figured it was a good safe place to get a list of everything I would need. The starter pack includes a whole bunch of stuff for wiring and doing custom electronics, nothing I would need. Just for fun I also added a very small 4.3 inch TV monitor for an additional US$50, which I have yet to hook up. But my friend got one as well and he loves little thing.
Setting up your pi…
I chose to purchase the preinstalled SD card for pure simplicity reasons, it was only a little bit more expensive and I figured doing so would save many headaches of trying to manipulate the card between my desktop and the pie. My dexterity can't handle it anymore. This way I was sure of the install that would work right from the get go.
- Plug everything in (Duh). Make sure the SD card is properly seated, you have power and network. When the pi is booted (should take only a few seconds) you should be rewarded with several LED lights. Red yellow and green. If you are greeted with a solid read only, your SD card is probably not well placed. This happened to us. Unplugged the pie, reseat the card and try again.
- Find your pie on your network. In order to be able to connect to it remotely, you need the pi's IP address. You can find this fairly easily through most newer routers or you can using IP scanner.
These are excellent instructions for your first time login using SSH
Raspberry Pi SSH Login without Monitor Through SSH login, enter this command:
sudo raspi-config
then follow this first time set up guide
As mentioned, out of the box you should be able to network into your pi using SSH. However there are a couple things you will want to make sure you do:- use your whole SD card
- check for updates
- check the boot behavior is set to desktop
- optionally change the default password for user pi (I believe the default password was…: pi) keep in mind, Linux-based systems such as the raspberry pie are case sensitive particularly important for remembering your passwords ;-)
- Now to install and set up VNC
- these are the instructions I used, but a very good step-by-step guide here: http://learn.adafruit.com/adafruit-raspberry-pi-lesson-7-remote-control-with-vnc/overview
- Personally I followed these instructions:
http://myraspberrypiexperience.blogspot.ca/p/setting-up-vnc.html
once VNC is installed, you will no doubt wanted to start on boot. These instructions will walk you through the process
http://myraspberrypiexperience.blogspot.ca/2012/08/start-vnc-automatically.html - reboot your pi (type reboot ) and reconnect using VNC
start VNC viewer on your desktop, enter the IP address of your raspberry pie followed by :1
the reason you want to do this is that you are specifying which desktop to connect to. You can run multiple desktops.

 |
| be sure to specify which desktop you want to connect to |
And there you have it. Your pie should now be up and running with a VNC connection.
One thing I should point out about VNC is while it's a great and convenient way to access your pi it does have a few limitations. You can use the accessibility tools from your Windows environment, for example I can use DragonDictate to send text and controls directly to the pi. However I cannot copy paste from my desktop through VNC onto pi, which can be a bit inconvenient (possibly because I'm using the free version).
Installing Siri proxy on your pi
One thing I should point out about VNC is while it's a great and convenient way to access your pi it does have a few limitations. You can use the accessibility tools from your Windows environment, for example I can use DragonDictate to send text and controls directly to the pi. However I cannot copy paste from my desktop through VNC onto pi, which can be a bit inconvenient (possibly because I'm using the free version).
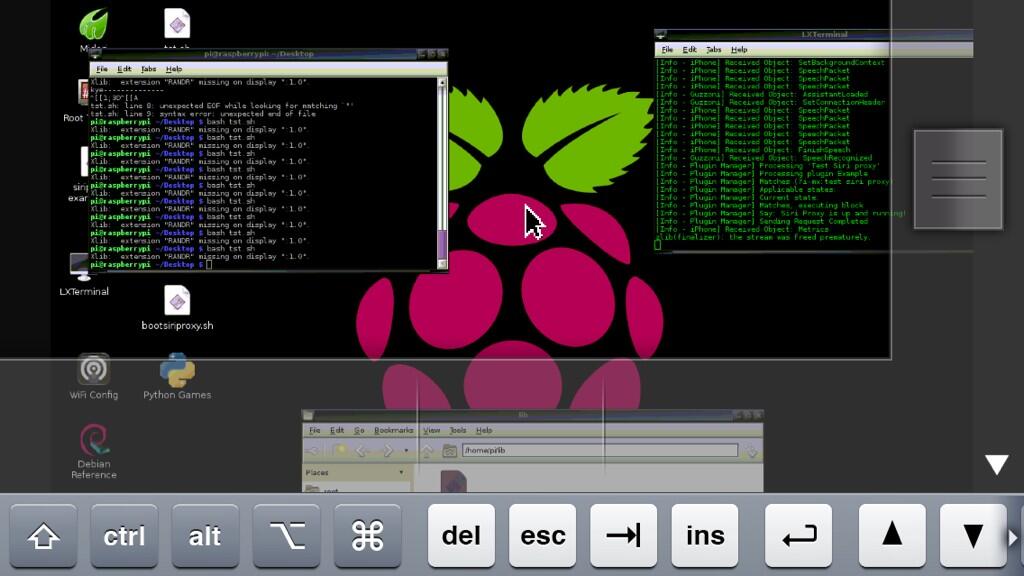 |
| Another reason why VNC is Uber cool I can connect to my pi from my iPad or iPhone! |
The best, and probably easiest way would be to follow Elvis impersonator's instructions. I installed mine through SSH, one command at a time. This step is a little bit more complicated as you will have to take out the commands from the text file one by one. Nonetheless, it's pretty straightforward and you will find the complete list of instructions here:
Optionally you can set up your raspberry pi to start Siri proxy on boot. Once again, just follow Elvis impersonator's instructions:
Personally I've not set my Siri proxy of to start on boot. I kind of like having the terminal window showing me the output so I can occasionally check up with what's going on. If you if you choose to start your Siri proxies this way, you will have to do it at the desktop level. Connected using VNC and run root terminal. In my case, for some reason it does not remember the path to the install, I simply have to rerun the following three commands in the root terminal to start the server.
- [[ -s "/etc/profile.d/rvm.sh" ]] && . "/etc/profile.d/rvm.sh"
- echo '[[ -s "/etc/profile.d/rvm.sh" ]] && . "/etc/profile.d/rvm.sh" # Load RVM function' >> ~/.bash_profile
- siriproxy server
Modifying the example plug-in
about to go through the details of how to go about modifying or creating your own plug-ins. I believe that is a project for you to figure ;-). However, I did create a little auto hotkey script which will make the process somewhat easier.
My goal was to allow myself to use my Windows environment to use the actual modifications to the example plug-in script. Doing so would give me full access to my voice control,and other accessibility features. Not to mention a nice editor. You can download my autohotkey script here:
 This script is just a convenient way to send a final from my Windows desktop to a raspberry. In order for to work you will need to have pscp.exe installed which of to download from the same place you downloaded PUTTY
 - In the first box, this is where you want to send a file. Specify as root user. type in the full path.
- The second box is the file that you want to copy to the raspberry pie. Press the select button, go find your file.
- in the final box use the select button to specify where you downloaded pscp.exe
- modify your source file, save it then press send it. This will copy the file onto your pie.
I created this only has one way send to pi because I don't expect have to copy files back from my pie , very often, if at all.
Conclusion
This should be enough of the pieces to get to well on your way. Goal here wasn't easy tutorial but more to show you where to find hold the parts. I'm finding it surprisingly easy to work with the pie in this manner. So if your voice is still strong in your house I need/use for Siri proxy, a raspberry pie is a relatively inexpensive, not overly complicated and very effective way to get it set up.
Wednesday, 9 January 2013
Home Automation, the 3rd Attempt

Introducing the "Jarvis Mod"
Wow. The Christmas holiday season can really get in the way of any plans you have for personal projects. I actually had the autohotkey script done at in early December, but all the obligations for this season and having the family around really slowed me down. Not that I am about that quickly anyway ;-)
Now I'm back to it. Introducing, the Jarvis mod for your Vera home automation system. But first a little back story.
We've talked before about how I'm starting to rely more and more on voice control for my computer. But that doesn't really help me out for the rest of my environment, so I started wondering if there was a way I could use voice to have some control over my environment. Ideally with minimal cost and using tools that are ready have.
The particular problem I was hoping to address was to be able to run my home automation system through my iPhone using Siri. I mean really, who would not want to be able to walk into their house speak a few instructions and have your environment respond to you in a similar way to what you see on Star Trek the next generation, or Jarvis (hence the name) from the movie Ironman.

Well, it turns out that there is!
Obviously, it's not going to be anywhere near as powerful as what you see in Star Trek or Ironman. However I can use Siri's existing functionality to send a message to my Vera Zwave home automation system. This is by definition a hack as it does use some digital duct tape and bailing wire to get this to work. But for my needs, it works very well. Check it out…
Obviously, it's not going to be anywhere near as powerful as what you see in Star Trek or Ironman. However I can use Siri's existing functionality to send a message to my Vera Zwave home automation system. This is by definition a hack as it does use some digital duct tape and bailing wire to get this to work. But for my needs, it works very well. Check it out…
It's probably easiest to visualize in the following chart.
 The Jarvis script is at its core very simple. It is a simple text parser which reads the text for key phrases such as: "turn on the family room light". It doesn't use any fancy heuristic to figure out the meaning of the sentence. It simply looks for keywords in a sentence. In this case those words would would be "light", "on" and "family room". It doesn't care about the order, just their presence. I can however send multiple instructions via one e-mail using Siri. Each sentence is interpreted as one instruction. So I can have several sentences to fire several different devices. The script looks for the "." As a separator between instructions.
It is very easy to add more commands. Commands presently are:
- turn on/off the basement/living room light
- lock/unlock the door
- run scene <scene name>
Now obviously this is going to reason some security questions. As I for sure do not want some stranger firing an e-mail to my house and operating my devices. So I do have some security protocols built in. Outlook requires the message to be from a certain e-mail which will remain secret ;-) it is also easy enough to integrate a password requirement into the autohotkey Script. This will be a simple day password (not yet implemented) where if it is absent from the script, Jarvis will not operate. It is also very easy to detect multiple, repeated attempts.
Also, I only activate my Jarvis script when I expect to need it.
Some might also ask why I chose to use autohotkey n this way as opposed to simply firing the instructions via Outlook. While this is possible to do via the integrated VBScript in Outlook I would have to duplicate the same code into the Microsoft speech macros to get the same functionality. I.e. doubling my maintenance requirements. Any change to one would have to be made to both. In This Way, Outlook and the speech macros simply messengers. Any changes, modifications or updates are simply done in the Jarvis script only. Also by using autohotkey it is very easy to add additional functionality to interface with any other system running on my computer. For example it would be easy enough to add commands to start iTunes and play music over my airplay system.
Unfortunately however, this Jarvis mod has been written to operate with my z wave system and PC set up. This means that unfortunately it will not be immediately portable into your environment. My intention here was to share the methods and show that it can be done. That said I will be including the text file with some additional instructions on how to do so. You will however require a basic autohotkey knowledge to know where to make the appropriate changes to your script.
 |
| Okay, I'll admit it… I just wanted to use this picture ;-) |
(Update: as of 14/1/2013 speech macros are included and functional)
I will be working on a tutorial on how to properly set this up in improving the provided instructions.
So I think it's safe to say that the myth you can't extend Siri functionality or improve on your voice control functionality is pretty much busted ;-)That being said, I really should point out will once again that this script is more of a first functional prototype or a proof of concept rather than a final product. And by definition, is not really modifying the function of Siri or any of the other systems, but extending the functionality by tying them together through another script… By definition to me, this is a hack ;-) I will be periodically updating or reworking the script.
Wednesday, 3 October 2012
Alternative to the Sticky Mouse
Windows 7 has a very large number of accessibility settings to help people with disabilities use their computers.but sometimes the settings you're looking for might not be where you would think. For example when I started to need the use of a sticky mouse function I looked through easy access settings under "change how your mouse works"and found a couple of interesting settings, but none really useful to me. So I went about creating this sticky mouse auto hotkey script.
Then, the other day I was having a conversation with the tech person for my rehabilitation facility and begun to talking about my sticky mouse script. She was very impressed with it and thought it worked very well. But she also pointed out that window 7 already had a similar function built-in which I did not know about. It is called "click lock" which you can find under the mouse settings. This surprised me because I really expected this type of function to be under "ease of access".

When you open those properties, you'll find it under the activities tab. Just turn on the little check box. Let's click lock is enabled, you will be able to modify the timing before click lock activates the settings tab. It's controlled by little slider, in the same way that the sticky mouse auto hotkey script is. There is however one key difference and that is click lock does not give you any cute to indicate that it has locked your click. It is however more closely integrated into the Windows 7 operating system, consequently I would expect that it may have additional functionality/support that sticky mouse auto hotkey script does not.
Admittedly, I'm probably a little biased to my sticky mouse script but there's one thing that I very much prefer. I don't need the sticky mouse functionality 100% of the time, therefore it's very easy for me to click off from the taskbar. Simply right-click, exit script. If I were to try and disable click lock, well I have to navigate through the space control panel down to mouse properties every time I would want to turn it on or off. I know this is minor, but there are more steps involved and thus making it a bit more inconvenient.
In any case, it's well worth trying…
Then, the other day I was having a conversation with the tech person for my rehabilitation facility and begun to talking about my sticky mouse script. She was very impressed with it and thought it worked very well. But she also pointed out that window 7 already had a similar function built-in which I did not know about. It is called "click lock" which you can find under the mouse settings. This surprised me because I really expected this type of function to be under "ease of access".

Admittedly, I'm probably a little biased to my sticky mouse script but there's one thing that I very much prefer. I don't need the sticky mouse functionality 100% of the time, therefore it's very easy for me to click off from the taskbar. Simply right-click, exit script. If I were to try and disable click lock, well I have to navigate through the space control panel down to mouse properties every time I would want to turn it on or off. I know this is minor, but there are more steps involved and thus making it a bit more inconvenient.
In any case, it's well worth trying…
Saturday, 11 August 2012
Autohotkey… Update to the sticky mouse

The functionality of sticky mouse is pretty much the same, but I've added an options page which will allow you to tweak the time delay between 0.1 and 1 second for the sticky mouse to activate. I've also added a toggle to the audio queue. Whatever you choose to set is also saved out to an INI file so that you will keep your settings on future runs of the script.
I've been using it fairly regularly this week and it seems to be pretty solid. I will however recommend not to set the sticky on delay to two small a time frame. For me about half a second seems to be a good value.
Monday, 30 July 2012
Autohotkey… The sticky mouse

You get this, sticky mouse script.
I've been starting to have some difficulty with long clicking and drags. I would lose my selection, drop things right don't want him and all around have a general pain in the butt about it. So to ease my frustration, and hopefully some of yours I wrote a very simple sticky mouse script with autohotkey.
The script simply waits for you to hold down the left mouse button one second, it then provides you with an audio cue to let you know that the script will now hold the button down for you. You can release the left mouse button and drag your window or icon around as you like. Click the button again and it will release.
You can get a copy of the sticky mouse here:
The Sticky Mouse Script
The sticky mouse will eventually be integrated into the friendly mouse script as well.
Enjoy! Let me know how it works out for you, please post a comment ;-)
Sunday, 24 June 2012
More Autohotkey Goodness
 The first, is really a great way to get started with autohotkey. What life hacker has done, is created a webpage which will automatically generate your first autohotkey scripts allowing you to bind all sorts of commands to various buttons on the keyboard that don't really see a lot the use on a day-to-day basis. Not only is this a great way to create your first scripts, is really a great way to get started learning what autohotkey can do for you.
Check out how to Put Your Keyboard’s Unused Keys to Use (by Turning Them into Awesome Shortcuts)!
And as an added bonus, if you are using voice to text software such as DragonDictate these commands are now available to you via voice by simply saying "press F1" for example…
The next tool they recently posted, is a story about how a fella out on the Internet has used autohotkey to modify the function of the number pad to interface with the Windows Aero snap feature.
For me the Windows Aero snap feature is something I used really quite a lot and with a 16:9 monitors, it's a great way to manage your screen space. For me I would always have what I'm writing on the left and my research/references on the right. This feature was really great for that.
; my first Windows hotkey override F2:: #Left F3:: #Right LAlt:: LWin return |
|---|
This was a very, very basic. Nowhere near the level of function you'll see and window pad… But I was very quickly able to use F2 and F3 to stop the window to the left or right of my screen... And it was available to DragonDictate ;-)
Now window pad is considerably more complex to modify, and its default state won't really work with DragonDictate… Because Dragon dictate does not recognize the Windows key... also, I've not really had a chance to play with window pad much yet, but I sure am planning to look into it and figuring out how to change the hotkeys so don't rely on a dual key press is going to be my personal project ;-)
WindowPad Uses Your Number Pad to Snap Windows to the Screen Edge
Both of these scripts are free and well worth the time and effort to check amount… And I feel both of which will likely make your interactions with the computer far smoother. Especially if you have Dragon ;-)
Wednesday, 6 June 2012
The Friendly Mouse Autohotkey Script
When using the mouse, my right hand has a tendency to spasm and rather inconveniently pushes the right mouse button. Needless to say this is quite annoying...
This was one of the first questions I directed at the technology group of my rehabilitation facility. They were a little short on options they did eventually find a program called "right off". While this program worked, I was quite dissatisfied with it, in particular the interface. There was no convenience to it. E.g. if my hand was working rather well at the moment I would have to navigate through task manager find the program and and its process. Also,this program gave no outward sign that it was actually running. Nothing showed the trail on the taskbar.
So I went about writing my own using autohotkey.
 The Friendly Mouse the script is available here. It creates a nice, neat little interface where you can toggle on and off function of the mouse buttons and also swap them. Future functionality will include an optional sticky left mouse.
Just a reminder, be sure to have autohotkey installed on your system before attempting to run the script. You can find all the insatructions you need on the autohotkey page
This was one of the first questions I directed at the technology group of my rehabilitation facility. They were a little short on options they did eventually find a program called "right off". While this program worked, I was quite dissatisfied with it, in particular the interface. There was no convenience to it. E.g. if my hand was working rather well at the moment I would have to navigate through task manager find the program and and its process. Also,this program gave no outward sign that it was actually running. Nothing showed the trail on the taskbar.
So I went about writing my own using autohotkey.
Just a reminder, be sure to have autohotkey installed on your system before attempting to run the script. You can find all the insatructions you need on the autohotkey page
Subscribe to:
Posts (Atom)