Anyway, I promised to get back to posting. But just to get something up quickly, here is an example video that my rehab facility asked me to produce for them. The is a demonstration of how I use my Toby tracker to assist me in my day to day life. The video is edited and as was provided to my rehab facility. Nonetheless, I think it does quite a good and detailed demonstration of how it works.

Showing posts with label accessible. Show all posts
Showing posts with label accessible. Show all posts
Wednesday, 6 May 2015
The awesome power of the Toby eye tracker
My apologies for having such a long radio silence. As you might've guessed, life is becoming a bit complicated and keeping me busy. I've also been wrapped up with a side project (which will be featured later, but you can see the early prototype at the beginning and end of the video) for using my voice bank.
Anyway, I promised to get back to posting. But just to get something up quickly, here is an example video that my rehab facility asked me to produce for them. The is a demonstration of how I use my Toby tracker to assist me in my day to day life. The video is edited and as was provided to my rehab facility. Nonetheless, I think it does quite a good and detailed demonstration of how it works.
Anyway, I promised to get back to posting. But just to get something up quickly, here is an example video that my rehab facility asked me to produce for them. The is a demonstration of how I use my Toby tracker to assist me in my day to day life. The video is edited and as was provided to my rehab facility. Nonetheless, I think it does quite a good and detailed demonstration of how it works.

Saturday, 21 December 2013
The Blue Ant
 |
| No… not this guy! |
Honestly, I think this is probably the single biggest accessibility feature missing from Apple products. Voice triggering. I really wish they would add it, if they had I very likely would not have jail broken my iPhone.
What caught my attention was that once this devices. With your phone, it acts like any other hands-free device but allows voice activation. I could toggle Siri simply by saying "launch phone control", which is essentially the same function provided by the jailbreak with hands-free control. But if someone were to call me, the blue ant would ring, in the same way as it would a Bluetooth headset but, having integrated with my phonebook it will verbally tell me who's calling and all I have to do is send say "answer".

I've been using it on and off for couple months and surprisingly I'm not finding it quite as useful as I had hoped. First of all, I'm told that the audio quality for the person I'm talking to is quite good. Better than with other hands-free devices. However there are three things which I find really get in the way of regular usage.
- Voice to text speech recognition… Not so hot.
I use this far more frequently than I do for making or answering phone calls.. Updating my status on Facebook, sending text messages or quickly replying to an e-mail. I use voice to text quite a bit. I have found that going through the blue and commute significantly diminishes the recognition accuracy. Which is really quite unfortunate. - Another device to carry around…
For me, the whole point of going to the iPhone and keeping with my was the reduction of things that they needed to have attached to my waist. Providing the maximum amount of functionality for the least amount of stuff. The blue ant commute, would require me to carry around another device. And at this point, verbally being able to answer calls does not add sufficient utility to justify. - Cannot verbally hang up
It's great to be able to answer hands-free, but if you can't have some other means to end the call. You're still required to manually terminated either by manipulating your iPhone or the blue ant itself. This might not sound like that big of a deal, but when you want to get off the phone with the telemarketer or someone who just… Won't… Shut… Up…we've all been there

The blue ant commute usually retails for around $100 Canadian. I however found it on sale for about $70.
Don't get me wrong, the device does have its usefulness and is I've said, the audio quality for regular phone calls is really quite good. It is small (almost the same dimensions as the iPhone 5), easily portable and is something that can easily be attached to the side wheelchair, your belt and so forth as it's intended to be mounted on the sun visor of your car. I should however point out, I've not used it in the car yet.
So, if you do not want to jailbreak your iPhone (and with IOS 7, you presently can't anyway) this could be a pretty good way to get some hands-free control back. Sure, the Bluetooth range on the blue ant isquite good and I can probably use it throughout my house, but because of the limitations mentioned above, I still prefer to carry around my iPhone. It is presently Velcro to my waist.
The utility of the blue ant is good, but just not sufficient to completely address my needs for day-to-day use at this point in time. So in conclusion:


Friday, 6 December 2013
Remote PC Start up Tools & Siri proxy
This is a little project that is kept me occupied for some time now, partly to do with a few difficulties in implementation. But the idea is to allow me to remotely start my computer without having to find my way to the basement to do so.
 So why would someone want to remotely start the computer? Well I download quite a bit of media which is stored on the hard drive of my desktop and I use media streaming to send this content to one of my gaming consoles so I can watch it in the comfort of my family room which is on the ground floor. My desktop PC is in the basement separated by a flight of stairs with big nasty scary teeth and with mobility issues, I don't always feel like taking the chance. Especially when the lighting conditions are a little dark. For some reason this really messes with my balance, making stairs downright hazardous at times.
I tried a couple different apps, and hit a few speed bumps on the way that were not expected. Here's what I found.
Well, not so much.
I have an older Asus motherboard that those sales for wake on LAN. I figured this should be enough. Enabled it, set the magic package and would only work immediately after shutdown. The motherboard power savings would shut down the network connection is well after a period of time. This caused quite a bit of annoyance.
So for about $10, about it PCI express network card. This solves the problems. Once the BIOS was set, the PCI express port maintained power, even after the PC shutdown.
Secondly, not all routers will support away, and set up. In particular Linksys routers (which is what I have) don't allow you to set the subnet mask 255.255.255.255 which is required to forward the magic packet the subnet mask needs to be set to 255.255.255.128. Contact Linksys cares technical support via twitter. They were very helpful with me for sorting this out.
There are a couple ways to send this.
 iShutdown Is probably about the easiest way to go. Simply install the app on your smart phone and then from the link here, install the service on your desired desktop. Once everything is installed, with your PC running simply search for the server via the smart phone app. It should detect it right away.
This will allow you to remotely start and stop your computer and has a very nice interface. It's also very easy to monitor several computers if you so choose.
iShutdown Is probably about the easiest way to go. Simply install the app on your smart phone and then from the link here, install the service on your desired desktop. Once everything is installed, with your PC running simply search for the server via the smart phone app. It should detect it right away.
This will allow you to remotely start and stop your computer and has a very nice interface. It's also very easy to monitor several computers if you so choose.
This simplicity makes it well worth the $2
 Your next the best option would be to try send a magic packets with depicus.com. This is also a very good app. Works flawlessly, but is a little bit more technical as it exposes you to more of the raw details. It however also has the scanning function to find computers on your network. But what is very interesting, is that also offer a free wake on LAN packet sniffer which will allow you to view magic packets that are being sent and received by your PC. Very useful when you're setting things up to make sure things are going to the right places
This is also $2 on the App Store.
Then there is the Siri proxy… My personal favorite!
 If you've already figured out how to get Siri proxy running on raspberry pie, this edition is actually really quite easy, and it's free! If you are running Debian like me. Go here for information on the install
And this should be enough to get your serial proxy sending magic packet.
But having set this up, if I decide to watch a movie I simply voice activate my iPhone, tell her to wake up my computer and within a minute or so the media servers visible on the network.
Very convenient, very fun. :-)
If you're looking to set up a wake on LAN, I hope this helps you set one up.

I tried a couple different apps, and hit a few speed bumps on the way that were not expected. Here's what I found.
First off, the speed bumps
Every motherboard on your computer nowadays will have a wired network connection. If you go through the BIOS is just about guaranteed that it will support some sort of wake on LAN functionality. Simply enable it, and you should be good to go right?Well, not so much.
I have an older Asus motherboard that those sales for wake on LAN. I figured this should be enough. Enabled it, set the magic package and would only work immediately after shutdown. The motherboard power savings would shut down the network connection is well after a period of time. This caused quite a bit of annoyance.
So for about $10, about it PCI express network card. This solves the problems. Once the BIOS was set, the PCI express port maintained power, even after the PC shutdown.
Secondly, not all routers will support away, and set up. In particular Linksys routers (which is what I have) don't allow you to set the subnet mask 255.255.255.255 which is required to forward the magic packet the subnet mask needs to be set to 255.255.255.128. Contact Linksys cares technical support via twitter. They were very helpful with me for sorting this out.
How does it work?
Very simply, we will be using a computer or a smart phone to send what's called a magic packet over your local area network to the desired (powered down) computer. Once you BIOSes appropriately set up, your network card essentially never sleeps and monitors the network for the appropriate magic package.There are a couple ways to send this.
 iShutdown Is probably about the easiest way to go. Simply install the app on your smart phone and then from the link here, install the service on your desired desktop. Once everything is installed, with your PC running simply search for the server via the smart phone app. It should detect it right away.
This will allow you to remotely start and stop your computer and has a very nice interface. It's also very easy to monitor several computers if you so choose.
iShutdown Is probably about the easiest way to go. Simply install the app on your smart phone and then from the link here, install the service on your desired desktop. Once everything is installed, with your PC running simply search for the server via the smart phone app. It should detect it right away.
This will allow you to remotely start and stop your computer and has a very nice interface. It's also very easy to monitor several computers if you so choose.
This simplicity makes it well worth the $2
Your next the best option would be to try send a magic packets with depicus.com. This is also a very good app. Works flawlessly, but is a little bit more technical as it exposes you to more of the raw details. It however also has the scanning function to find computers on your network. But what is very interesting, is that also offer a free wake on LAN packet sniffer which will allow you to view magic packets that are being sent and received by your PC. Very useful when you're setting things up to make sure things are going to the right placesThis is also $2 on the App Store.
Then there is the Siri proxy… My personal favorite!

- open terminal and type
aptitude install wakeonlan - test the install
- run that but that this is packet sniffer on your PC.
By default it should be on port 7 - type this into terminal
wakeonlan -p 7 YOUR_MAC_ADDRESS - if everything ends working correctly you should see something like this
http://www.depicus.com/wake-on-lan/wake-on-lan-monitor.aspx
#wake on LAN-------------------------------------------------
listen_for /wake up my (computer|PC|desktop)/i do say "waking up your computer" system 'wakeonlan -p 7 YOUR_MAC_ADDRESS' request_completed #always complete your request! Otherwise the phone will "spin" at the user! end |
|---|
But having set this up, if I decide to watch a movie I simply voice activate my iPhone, tell her to wake up my computer and within a minute or so the media servers visible on the network.
Very convenient, very fun. :-)
If you're looking to set up a wake on LAN, I hope this helps you set one up.
Wednesday, 16 October 2013
Old IPhone, New Life As Dedicated Dragon Mic
Back in July, I did a post about various microphones for use with Dragon naturally speaking. Some working better than others. The one microphone, that has always impressed me for its ability to comprehend what I'm saying but has been terribly convenient was the dragon microphone app for iPhone. The reason I found it not terribly convenient was because my screen lock would time out and locked my iPhone. Shutting down the microphone, often in midsentence.
Yes, I could easily go into the settings and change the timeout time. But the pain in the butt is that I
 would have to do this every single time. Not to mention, I would have to remember to set it when I'm done. Not terribly convenient.
Then, for some reason the other day it dawned on me that I had by old iPhone 3GS sitting around doing nothing. So I decided to install the Dragon microphone app, and plug it into my PC to give constant power (not that it really needs this as the battery is still good) then I changed the lock screen timeout to "never".
This is working out really quite well. As a matter of fact, I'm using it at the moment and the recognition is near 100% simply sitting on my desk nowhere near my mouth and I'm speaking at a regular volume.
The only downside I have encountered so far is that I can no longer use the on-screen microphone button nor the keyboard on my PC to toggle the microphone on or off. I have to touch the iPhone. It does however respond very well to the "go sleep" and "wake up" commands. Unfortunately however, the Dragon Does not allow you to use your iPhone as a regular mic to your PC. Only interfaces with Dragon NaturallySpeaking. Which is fine for me!
 All in all, this is a great way to recover some use of the old technology. It was destined to be a toy for my three-year-old (cracked screening and all) or be recycled as it now has no resale value. This way I can use it just about every day when I'm in front of the computer, greatly extending its life and utility for me.
Don't have an old iPhone? All that you can find one which is off plan for cheap on craigslist, kijiji or the like ;-)
Yes, I could easily go into the settings and change the timeout time. But the pain in the butt is that I

Then, for some reason the other day it dawned on me that I had by old iPhone 3GS sitting around doing nothing. So I decided to install the Dragon microphone app, and plug it into my PC to give constant power (not that it really needs this as the battery is still good) then I changed the lock screen timeout to "never".
This is working out really quite well. As a matter of fact, I'm using it at the moment and the recognition is near 100% simply sitting on my desk nowhere near my mouth and I'm speaking at a regular volume.
The only downside I have encountered so far is that I can no longer use the on-screen microphone button nor the keyboard on my PC to toggle the microphone on or off. I have to touch the iPhone. It does however respond very well to the "go sleep" and "wake up" commands. Unfortunately however, the Dragon Does not allow you to use your iPhone as a regular mic to your PC. Only interfaces with Dragon NaturallySpeaking. Which is fine for me!
 All in all, this is a great way to recover some use of the old technology. It was destined to be a toy for my three-year-old (cracked screening and all) or be recycled as it now has no resale value. This way I can use it just about every day when I'm in front of the computer, greatly extending its life and utility for me.
Don't have an old iPhone? All that you can find one which is off plan for cheap on craigslist, kijiji or the like ;-)
Wednesday, 11 September 2013
Oh Just Kilt Me Already!
That's right, I've decided to start wearing a kilt around the house. But before we get into talking about that, we need to make one thing clear first…
Okay, now that we've established the rules. Kilts are not dresses or skirts and exceptionally manly… Why am I wearing one? (As matter of fact I'm wearing it right now)
Kilts, in the traditional sense are supposed to be worn "commando", and although they are quite comfortable worn in this manner and provide good "air conditioning" its not exactly why I'm wearing one. Due to the illness, and the restricted movements of my arms I started finding it very difficult to go to the washroom on my own. Getting my pants and underwear off was not that big deal (it has become more challenging), but afterwards it's become nearly impossible to put them back on. For months, I would have to shuffle into my room in various states of disrobe, lie down on my bed and perform all sorts of gymnastics to get my pants & underwear back up. Then of course came the chore of doing them back up.
Of course, if you see my previous post about my status you will no doubt have noticed that I rate the function of my hands and arms in around 15% right now. Because of this, and the fact that I spend large portions of the day on my own, I needed to find a solution that provided a better "access" to prevent "accidents". So far the kilts solution is working out reasonably well. Much easier than dealing with pants and underwear. But the key to this is of course wearing them "commando". It's also for this reason, I wear them around the house only, kind of like pajamas. They are not intended to leave the house.
Sorry folks, a little bit more in the graphic details in this paragraph… Going to the washroom now is much easier. Especially to go pee. Because of the dexterity problems I do have to sit to urinate, this eliminates "accuracy problems". The kilt is very easy to keep out of the way when sitting. However, when I have to "drop the kids off at the pool" its a bit more challenging to make sure the kilt is out of the way. But with a little bit of effort, it is much more manageable then dealing with pants and underwear afterwards. So far I've not had any "misses".
 So where do I get mine? I'm wearing a deluxe utility kilt purchased from http://www.utkilts.com/. Not the traditional wool type. A traditional wool kilts would be far too heavy and unmanageable (I used to have one for Halloween costume). The utility kilt is great and has some really cool cargo pockets on either side. There are surprisingly accessible and very easy for me to keep my cell phone in. They come in a variety of designs and colors and are fairly reasonably priced.
Before finding this website, I actually ordered mine from eBay from this company. Consequently I ended up paying a little more than I otherwise would have. If you order directly from http://www.utkilts.com/ it works out to be a little less expensive, saving you about $15. The kilts are shipped by the pound, with a minimum shipping cost of about $30. But adding more than one kills only adds about six dollars to the shipping cost, so if you are serious about wearing a kilt ordering more than one might be in your interest. As a matter of fact as soon as their stock is back in, I am going to be ordering two more deluxe utility kilts.
You can also check out http://www.utilikilts.com/ for more options. These people look to provide very good quality and I believe have been in business longer. They are however significantly more expensive. Don't be confused by the second, they're not the same company as http://www.utkilts.com/
Pros:
Cons:
Conclusions:
very happy with the product, find them reasonably priced and work well as adapted clothing. I am buying more :-)

Kilts, in the traditional sense are supposed to be worn "commando", and although they are quite comfortable worn in this manner and provide good "air conditioning" its not exactly why I'm wearing one. Due to the illness, and the restricted movements of my arms I started finding it very difficult to go to the washroom on my own. Getting my pants and underwear off was not that big deal (it has become more challenging), but afterwards it's become nearly impossible to put them back on. For months, I would have to shuffle into my room in various states of disrobe, lie down on my bed and perform all sorts of gymnastics to get my pants & underwear back up. Then of course came the chore of doing them back up.
 |
| trying it on, fresh out-of-the-box |
Sorry folks, a little bit more in the graphic details in this paragraph… Going to the washroom now is much easier. Especially to go pee. Because of the dexterity problems I do have to sit to urinate, this eliminates "accuracy problems". The kilt is very easy to keep out of the way when sitting. However, when I have to "drop the kids off at the pool" its a bit more challenging to make sure the kilt is out of the way. But with a little bit of effort, it is much more manageable then dealing with pants and underwear afterwards. So far I've not had any "misses".

Before finding this website, I actually ordered mine from eBay from this company. Consequently I ended up paying a little more than I otherwise would have. If you order directly from http://www.utkilts.com/ it works out to be a little less expensive, saving you about $15. The kilts are shipped by the pound, with a minimum shipping cost of about $30. But adding more than one kills only adds about six dollars to the shipping cost, so if you are serious about wearing a kilt ordering more than one might be in your interest. As a matter of fact as soon as their stock is back in, I am going to be ordering two more deluxe utility kilts.
You can also check out http://www.utilikilts.com/ for more options. These people look to provide very good quality and I believe have been in business longer. They are however significantly more expensive. Don't be confused by the second, they're not the same company as http://www.utkilts.com/
Pros:
- very comfortable
- price for the kilts is reasonable. Ranging from $50-$80 depending on the design you choose
- makes "access" for nature's call much easier for me
Cons:
- you will no doubt have to deal with the jokes of it being a skirt. If this is a real problem I recommend the following kilted T-shirt as well
- can obviously be a little cold in the winter
- unfortunately shipping costs are little high here in Canada
- the fabric is a little bit stiff, even after the first wash. Making him a little bit hard to sit down comfortably and not on a wad of folded fabric
- pay extra attention to the sizing instructions! This is critical. They are not in size like regular pants
very happy with the product, find them reasonably priced and work well as adapted clothing. I am buying more :-)

Friday, 19 July 2013
Reading without thumbs
It's been a long time now since my hands have let me hold on to anything. Papers are particularly a problem, and I can forget books. However I do want to keep up on my literature from time to time. I particularly enjoyed reading on my iPad. I have an iPad three, with the retina display which makes the reading experience really quite enjoyable. Sure, I can't use all of the features that easily anymore, but I can still tell the reader to scroll and or turn the page.
For a while I used a folding cover for in this worked okay for a while. But where I'm at now, this is extremely awkward to get set up and sometimes a pain in the butt to keep his position.
 A while back, a friend of mine posted a picture of himself using something from the Apple store called a hover bar. This is essentially a flexible bar that you clamped to your table with a flexible arm which is about 2 feet long. Your iPad snaps into this, you bend it into position and it holds itself up right.
I thought this was quite a neat idea worth trying. They were however asking C$80 for it, which seemed a little bit much. So I decided to try an exact copy of it I found on Amazon.com for about $50 called a GMYLE® Black 360º One-way Clamp Adjustable Arm Stand . The only difference that I could tell was in the clamping mechanism. As opposed to using an Allen key, it has a built in arm to turn a screw on clamp.
 I'm reasonably pleased with the purchase, I am however trying to figure out how to make the best use of it. Not quite worked out all the kinks yet. Is what works and what doesn't:
awesomeness:
For a while I used a folding cover for in this worked okay for a while. But where I'm at now, this is extremely awkward to get set up and sometimes a pain in the butt to keep his position.
 A while back, a friend of mine posted a picture of himself using something from the Apple store called a hover bar. This is essentially a flexible bar that you clamped to your table with a flexible arm which is about 2 feet long. Your iPad snaps into this, you bend it into position and it holds itself up right.
I thought this was quite a neat idea worth trying. They were however asking C$80 for it, which seemed a little bit much. So I decided to try an exact copy of it I found on Amazon.com for about $50 called a GMYLE® Black 360º One-way Clamp Adjustable Arm Stand . The only difference that I could tell was in the clamping mechanism. As opposed to using an Allen key, it has a built in arm to turn a screw on clamp.

awesomeness:
- hold the iPad in position as advertised
- makes it possible to read fairly comfortably.
- Will support nearly unlimited positions and orientations
- you can clamp it just about anywhere (even a hospital bed if need be)
- as my arms and hands are extremely weak, it can be very difficult to reposition.
- The ball joint on the back can be a little loose, causing the iPad pitch down out of position.
- once my iPad is clipped, there's absolutely no way I can get it out myself

- depending on what I'm doing, it can make it easier to access certain features or parts of the screen or more difficult. For example reading iBooks or magazine once it's open is much easier. However maybe pushing the "library" button within ibooks might be more difficult to reach.
All in all, I'm reasonably pleased with it. I don't know if I would have been quite as happy if I had purchased the $80 version and had the same difficulties with it. But for $50 it feels like money well spent and does help me keep reading and very pleasant format. The iPad is great for reading a wide variety of formats… I'm particularly enjoying the walking dead graphic novels and popular science magazines from the newsstand. Unfortunately it's not helping me get back into playing even some of the simpler games I have to pass the time (Magic the gathering on iPad is great).
I had however hoped it would worked with Griffin Beacon as my remote. While it communicates fine, it doesn't help me with the ease of access. I still prefer to go back to my iPhone that.
It will however be a great set up for videos and Netflix.
So all in all, I have to admit I'm not totally sure if it's a 100% thumbs-up or thumbs down. It solves some problems but incurs a few others. So I'll say this, if you have the spare cash it's worth a try. I do enjoy being able to comfortably read again, and not being tethered to my PC to do so… So I guess that's a little more of that thumbs-up.
 |
final verdict?
Not totally sure… Thumbs up or thumbs down.
Honestly, little bit of both.
|
It will however be a great set up for videos and Netflix.
So all in all, I have to admit I'm not totally sure if it's a 100% thumbs-up or thumbs down. It solves some problems but incurs a few others. So I'll say this, if you have the spare cash it's worth a try. I do enjoy being able to comfortably read again, and not being tethered to my PC to do so… So I guess that's a little more of that thumbs-up.
Tuesday, 25 June 2013
Raspberry pie versus Desktop
I know, I'm a bit overdue for a post. One of the reasons being is that I decided to try running a raspberry pie for my Siri proxy and have been occupied playing with that. Initially, I was just going to use the desktop that was arranged for me my friend. A Siri proxy is a great use for an old machine, and the one that was given to me was a beast in its day, grossly overpowered for my needs.
 As you saw in the previous post about setting up a home automation system, the setup was reasonably easy. It did however require that at first the Ubuntu machine has a keyboard mouse and monitor hooked up to it. Once this is all done, I could fairly easily use VNC to connect to it. From there I can use all my assistive technology to do the installation I need. But the initial setup was a bit cumbersome for this reason only. Without hands that works very well, the required manipulation of the keyboard and mouse was challenging. The other thing is that the old desktop, being is overpowered as it was generated a fair bit of heat and consequently had a number of fans and to keep cool. The machine was a bit noisy.
So, for a friends birthday we thought a raspberry pie would be a perfect gift for him and on a bit of an impulse (also some encouragement from my girlfriend) I decided to order one for myself as well knowing it could be used as a Siri proxy. After all, this is how siri proxy first came to my attention with Elvis impersonators raspberry pie garage door opener.
I did need to help to set up initial wiring and plugging the SD card. But once that was done, set up was actually far easier than with the desktop, and not just because I'd gone through the process previously. Out-of-the-box, once the pie is plugged in it boots up by itself (no power button) it is set up to network into it immediately. No need for a keyboard, mouse or even monitor. Simply use putty.exe to get started. The raspberry pie is dead quiet. There are no fans, nothing to make noise. As a matter of fact it requires only 5 V to run this the 700 MHz, credit card sized computer. Pretty impressive, especially for just US$40.

 This script is just a convenient way to send a final from my Windows desktop to a raspberry. In order for to work you will need to have pscp.exe installed which of to download from the same place you downloaded PUTTY

So, for a friends birthday we thought a raspberry pie would be a perfect gift for him and on a bit of an impulse (also some encouragement from my girlfriend) I decided to order one for myself as well knowing it could be used as a Siri proxy. After all, this is how siri proxy first came to my attention with Elvis impersonators raspberry pie garage door opener.
I did need to help to set up initial wiring and plugging the SD card. But once that was done, set up was actually far easier than with the desktop, and not just because I'd gone through the process previously. Out-of-the-box, once the pie is plugged in it boots up by itself (no power button) it is set up to network into it immediately. No need for a keyboard, mouse or even monitor. Simply use putty.exe to get started. The raspberry pie is dead quiet. There are no fans, nothing to make noise. As a matter of fact it requires only 5 V to run this the 700 MHz, credit card sized computer. Pretty impressive, especially for just US$40.
Want to give it a try? Here's what you'll need…
I am presently running my pie headless (without monitor or keyboard) and am going to assume you're wanting to use the same here.We ordered everything from www.adafruit.com Here's the minimum parts that you will need to get started:

- A raspberry pi model B. US$40
- 5 V power adapter a micro USB cable. US$10
- SD card for Raspberry Pi preinstalled with Raspbian Wheezy US$15
- network cable.
And that's it! You can get a raspberry pi, Siri proxy server up and running for about US$65. I would however recommend also purchasing a case for it, it's always a good idea to protect and exposed circuit board. You can buy one for as little as US$10
I based this list on the starter pack listed on their website. I figured it was a good safe place to get a list of everything I would need. The starter pack includes a whole bunch of stuff for wiring and doing custom electronics, nothing I would need. Just for fun I also added a very small 4.3 inch TV monitor for an additional US$50, which I have yet to hook up. But my friend got one as well and he loves little thing.
Setting up your pi…
I chose to purchase the preinstalled SD card for pure simplicity reasons, it was only a little bit more expensive and I figured doing so would save many headaches of trying to manipulate the card between my desktop and the pie. My dexterity can't handle it anymore. This way I was sure of the install that would work right from the get go.
- Plug everything in (Duh). Make sure the SD card is properly seated, you have power and network. When the pi is booted (should take only a few seconds) you should be rewarded with several LED lights. Red yellow and green. If you are greeted with a solid read only, your SD card is probably not well placed. This happened to us. Unplugged the pie, reseat the card and try again.
- Find your pie on your network. In order to be able to connect to it remotely, you need the pi's IP address. You can find this fairly easily through most newer routers or you can using IP scanner.
These are excellent instructions for your first time login using SSH
Raspberry Pi SSH Login without Monitor Through SSH login, enter this command:
sudo raspi-config
then follow this first time set up guide
As mentioned, out of the box you should be able to network into your pi using SSH. However there are a couple things you will want to make sure you do:- use your whole SD card
- check for updates
- check the boot behavior is set to desktop
- optionally change the default password for user pi (I believe the default password was…: pi) keep in mind, Linux-based systems such as the raspberry pie are case sensitive particularly important for remembering your passwords ;-)
- Now to install and set up VNC
- these are the instructions I used, but a very good step-by-step guide here: http://learn.adafruit.com/adafruit-raspberry-pi-lesson-7-remote-control-with-vnc/overview
- Personally I followed these instructions:
http://myraspberrypiexperience.blogspot.ca/p/setting-up-vnc.html
once VNC is installed, you will no doubt wanted to start on boot. These instructions will walk you through the process
http://myraspberrypiexperience.blogspot.ca/2012/08/start-vnc-automatically.html - reboot your pi (type reboot ) and reconnect using VNC
start VNC viewer on your desktop, enter the IP address of your raspberry pie followed by :1
the reason you want to do this is that you are specifying which desktop to connect to. You can run multiple desktops.

 |
| be sure to specify which desktop you want to connect to |
And there you have it. Your pie should now be up and running with a VNC connection.
One thing I should point out about VNC is while it's a great and convenient way to access your pi it does have a few limitations. You can use the accessibility tools from your Windows environment, for example I can use DragonDictate to send text and controls directly to the pi. However I cannot copy paste from my desktop through VNC onto pi, which can be a bit inconvenient (possibly because I'm using the free version).
Installing Siri proxy on your pi
One thing I should point out about VNC is while it's a great and convenient way to access your pi it does have a few limitations. You can use the accessibility tools from your Windows environment, for example I can use DragonDictate to send text and controls directly to the pi. However I cannot copy paste from my desktop through VNC onto pi, which can be a bit inconvenient (possibly because I'm using the free version).
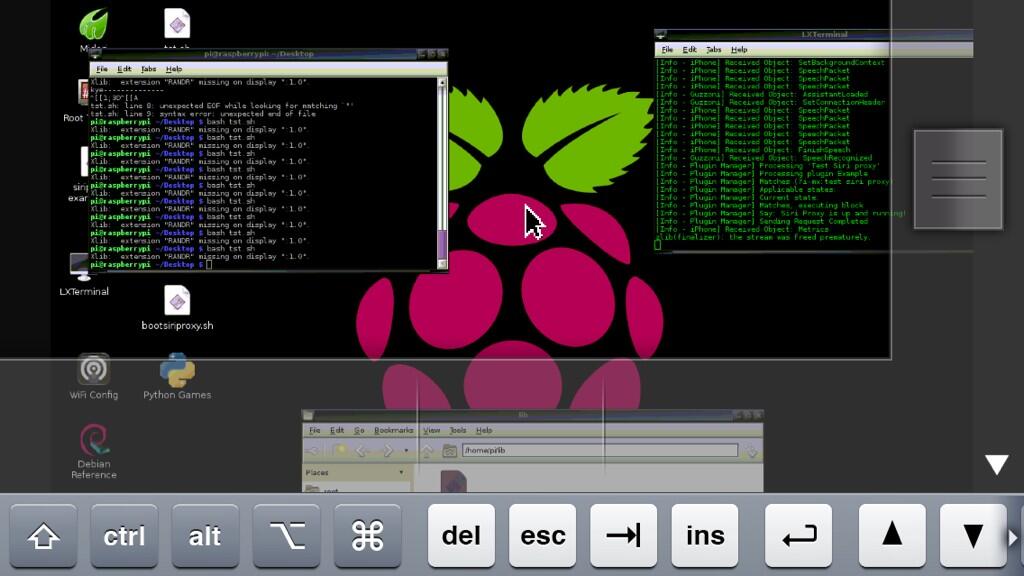 |
| Another reason why VNC is Uber cool I can connect to my pi from my iPad or iPhone! |
The best, and probably easiest way would be to follow Elvis impersonator's instructions. I installed mine through SSH, one command at a time. This step is a little bit more complicated as you will have to take out the commands from the text file one by one. Nonetheless, it's pretty straightforward and you will find the complete list of instructions here:
Optionally you can set up your raspberry pi to start Siri proxy on boot. Once again, just follow Elvis impersonator's instructions:
Personally I've not set my Siri proxy of to start on boot. I kind of like having the terminal window showing me the output so I can occasionally check up with what's going on. If you if you choose to start your Siri proxies this way, you will have to do it at the desktop level. Connected using VNC and run root terminal. In my case, for some reason it does not remember the path to the install, I simply have to rerun the following three commands in the root terminal to start the server.
- [[ -s "/etc/profile.d/rvm.sh" ]] && . "/etc/profile.d/rvm.sh"
- echo '[[ -s "/etc/profile.d/rvm.sh" ]] && . "/etc/profile.d/rvm.sh" # Load RVM function' >> ~/.bash_profile
- siriproxy server
Modifying the example plug-in
about to go through the details of how to go about modifying or creating your own plug-ins. I believe that is a project for you to figure ;-). However, I did create a little auto hotkey script which will make the process somewhat easier.
My goal was to allow myself to use my Windows environment to use the actual modifications to the example plug-in script. Doing so would give me full access to my voice control,and other accessibility features. Not to mention a nice editor. You can download my autohotkey script here:
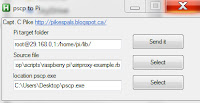
 This script is just a convenient way to send a final from my Windows desktop to a raspberry. In order for to work you will need to have pscp.exe installed which of to download from the same place you downloaded PUTTY
 - In the first box, this is where you want to send a file. Specify as root user. type in the full path.
- The second box is the file that you want to copy to the raspberry pie. Press the select button, go find your file.
- in the final box use the select button to specify where you downloaded pscp.exe
- modify your source file, save it then press send it. This will copy the file onto your pie.
I created this only has one way send to pi because I don't expect have to copy files back from my pie , very often, if at all.
Conclusion
This should be enough of the pieces to get to well on your way. Goal here wasn't easy tutorial but more to show you where to find hold the parts. I'm finding it surprisingly easy to work with the pie in this manner. So if your voice is still strong in your house I need/use for Siri proxy, a raspberry pie is a relatively inexpensive, not overly complicated and very effective way to get it set up.
Thursday, 16 May 2013
Accessible Plates
One of the projects I've been working on for some time with my occupational therapist was to find some decent plates that worked well for me. This has, surprisingly been far more difficult than one would've expected.
 |
| Stay still dammit! I'm trying to eat! |
Probably about a year ago when we first started looking at better plates and bowls for me, my occupational therapist gave me a couple samples to try. One that particularly liked was steelite plate. So after using this plate for a few months and having increasing difficulties with regular plates, I decided that I would like to get some more of these plates rather than just one. I asked my occupational therapist for more.She told me that the only had one on hand, and couldn't remember where it came from. Nonetheless I said these are the ones I wanted.
Over the course of several months I was repeatedly told that she was unable to find them and that they were likely discontinued. So one day about two months ago she when asked about the progress on the plates, she explains this again and she says that she will keep looking on her side but that I could also go try a few stores but that she would need a moment to call one of her colleagues to get the names of the stores.
"No problem I say" after all I expect the names of specialty.

While I stare at her for a moment completely dumbfounded she grabs a piece of paper and proceeds to write the stores down for me. Okay, now she's insulting my intelligence. I honestly felt like I'd walked into a specialty bookstore asked for the first edition copy of Don Quixote and the reply is "have you tried the public library?" I come to see these experts in the hopes that they have access to resources that I do not have in order to expedite the process in acquiring the adaptations and devices that they need.
Not to mention that having ALS means I don't have the mobility, energy nor time to race all over town to track this down myself. It was my understanding that's why we have an occupational therapist as rehabilitation facility.
AAAAAANYWAY… Enough venting about that.
This frustration sent me on an intranet quest. Through the appropriate use of Google I was able to quickly find a few suppliers. The first ones were unfortunately all in the UK and Europe. They were willing to ship to me in order, but because of the distances involved the order would've had to be a little larger than I had hoped and the shipping costs were, well. Expensive. Here's a couple of the links I found:
- http://www.completecareshop.co.uk/disability-elderly-aid/3208/steelite_plate_-_medium.html
- http://www.nrs-uk.co.uk/steelite-plate.html
Through a few more manipulations of Google, I contacted the North American steelite supplier, a gentleman named Gary who was extremely kind and helpful. They went on to explain that these plates are not available through the distributor as individual units. However they can be ordered by the case. It turns out a case is not terribly unreasonable, especially if you can share the order with someone. The plates come in two sizes. 8 1/2 inch and 10 a quarter inch.
Through discussions with the distributor, here's what I was able to acquire:
 |
 |
What I particularly like about these plates is that they are ceramic like any other plate. Because of this I don't feel like I'm using specialty plates that often. They're heavy and durable. From what I understand they were actually intended for old age homes. They have a nice gently curved been raised age that's not too high and works very well for helping push the food back onto your fork or spoon.
At first, I wasn't sure I'd find a whole bunch of benefit to having plates of different sizes. But I actually do. Some meals are much easier to manage and the smaller plate. For example when eating pasta, I'm less likely to drag my knock on us through my food to push up against the far side of the plate.
 Also, one of the great things about having plates of different sizes and colors like this is a help immensely with our coping strategy for a three-year-old son. From time to time we take one of the smaller plates for him two years so he can now have a big boy plate "just like dad" we are hoping to take some of the fear out of the situation with this. He is old enough that he starting to ask about questions.
The coffee mug is a great idea as well, having handles on both sides. It weighs about the same as any other coffee cup, but unfortunately due to the specifics of how my hands are starting to flatten out and deform this cup is proving not be as beneficial as I had hoped. I will say however it is easier for me to transfer coffee from the kitchen to where I sit. Unfortunately it's not really much easier to drink from for me. Mind you that's about the same for any cup these days, I'm having to use a straw a lot.
 |
| Yup! Great product. |
On the whole, I'm very pleased with these plates and the cup. They're the best thing I found for me to date. There are little bit hard to come by, but worth the effort. You can contact the gentleman who helped me here Gary gbennington@steelite-canada.com or you can go through their corporate site which is where I started.
You can view the whole line of the Rio steelite products here in their brochure.
Tuesday, 14 May 2013
A Little Hack for Dragon Naturally Speaking

As we all know, computers (especially Windows) need the occasional reboot. Not having my Dragon dictation online when the computer boots, well is kind of annoying. Especially because having hands that don't work so well and right clicking often being challenging these days I have to go but futzing with the mouse, right-click the task manager icon and select the user profile I want load.
I found a neat little way to force Dragon to load a specific user profile on reboot. Here's how you do it:
| open the Dragon in the start menu under startup start menu --> Start up --> Dragon NaturallySpeaking Quickstart |
 |
| right-click and edit the properties |  |
add the following the target (you must delete any existing flags and replace it with this)
/User "<YOUR USERNAME>"
| |
Doing so should tell Dragon to load this profile whenever Windows restarts. Be sure to pay special attention to the placement of the quotation marks.
Monday, 29 April 2013
Help with the Dental Hygiene
 |
| but Elmo has no teeth? |
These days it's becoming a bit of a challenge to brush my teeth. I've long since moved over to an electric toothbrush, but to get in the toothpaste onto the brush has become quite an adventure.
Whatever usually do is rest the toothpaste on the counter place my left hand on the to, and try to line up the toothbrush with my right hand and then squish it… Hoping it wouldn't get everywhere. It turned into quite a balancing act. Backspace and this was getting even more difficult as the to both Tuesdays with getting down to about half full.
 So started to look around online for an automatic toothpaste
dispenser. Finding one was actually pretty easy. There are several types to choose from on Amazon. But I found a pretty good one for around about C$15. Unfortunately, this particular project does not seem to have a specific name in the boxes shipped in is all written in Korean. That said, you should double to find this particular item (left) pretty easily.
 |
| Yep, I'm not the only one drooling… |
The toothpaste dispenser is designed to attach to the wall/mirror using 3M double-sided tape. This works okay, but in my case I have a bunch of little glass tiles where I've mounted it and sticks less well to those. Probably also because my three-year-old likes to pull it off the wall…
Anyway, is designed to work by screwing in your tube of toothpaste from the top and is a little lever in the whole that you push with toothbrush. This squeezes the tube of toothpaste and opens a valve dropping a portion of toothpaste (hopefully) on the brush. The first week or two, this didn't work out too terribly well. I found the amount of toothpaste delivered insufficient and often it was quite messy. In part because the toothpaste was either not dropping properly or because of my shaky hands would dump it all of the dispenser.
However, I seem to have gotten the hang of it… I guess there is apparently a bit of a technique for people with shaky hands and is working quite well right now. It does however still create a little bit of a mess.
 |
| Me and my boy! … No, not really… |
Pro:
- much easier than the toothpaste tube/toothbrush balancing act
- reasonably well controlled portion of toothpaste
Con:
- can be a bit messy
- double-sided tape can wear out and limit what you can stick it to. My options were the glass tiled wall or the Wood Cabinet. I'm pretty sure it would've ruined that
Cost: I paid about C$15 with shipping. Pretty good price.
You can check out an example of it in action here. This is just an example I found on YouTube, this is not my house ;-) Honestly though, given the cost it's really well worth the try.
Wednesday, 17 April 2013
Siri proxy & Home Automation
 |
| Well crap. That was only a matter of time… |
I first became aware of Siri proxy being used to drive home automation system while reading one of my favorite websites, life hacker. The article talked about Elvis impersonator who it created a plug-in to open and close his garage door and set the thermostat. Needless to say I found this to be pretty amazing, and far superior to anything I've attempted so far. So I went about looking into how to get this set up.
I've been wrestling with this for some time. First off, I didn't know anything about Ubuntu nor what would be the best way to install it. Particularly because of my dexterity limitations. Anyway, check out the results!
I have to say, I'm really quite pleased with the results. It was well worth the effort.
So what was required to get this up and running?
As mentioned, I had to first figure out how to work with Ubuntu and what was the best way to install it. For the time being, I'm running a bootable partition on my desktop PC. I am going to try to get a old PC/laptop running it 24/7. I also tried running it through virtual box. While the installation went smoothly, I had some difficulties getting Siri proxy up and running.
The and to create the functions for turning the light on/off or locking/unlocking the door, I had to figure out a little bit of Ruby script. Fortunately, modifying the sample plug-in is pretty straightforward and it's very easy to insert console commands to it, and fortunately I had already figured these commands out from my previous attempts…
If you would like to give it a try, here's the links to all of the resources you will need:
- Ubuntu http://www.ubuntu.com/download
Ubuntu is free to download and install. It is also very easy to install as bootable partition on your Windows PC
Installation instructions http://www.ubuntu.com/download/help/install-ubuntu-with-windows - alternatively, you can run it through virtual box inside your Windows operating system (if your PC has enough power) https://www.virtualbox.org/
- this tutorial will walk you through the process http://www.psychocats.net/ubuntu/virtualbox
- Installing Siri proxy
once you have Ubuntu up and running in either one of these two options you will need to install Siri proxy through the terminal inside Ubuntu.
follow these instructions, pasting each one after the other into the terminal window. https://github.com/plamoni/SiriProxy#set-up-instructions - if you need a visual walk-through first, this webpage has a now outdated demonstration of how to install it. The process is very similar, but the commands have changed. It does give you a good feel for how to get virtual box installed and the process required to get Siri proxy up and running.
http://www.idownloadblog.com/2011/12/09/how-to-install-siri-proxy-tutorial-video/
be sure to use the set of instructions on GITHUB, not the ones in the video! - Getting Siri proxy to do what you want
the easiest way to get started, and what I've done so far is to modify the example plug-in. You can find those instructions here https://github.com/plamoni/SiriProxy/wiki/Plugin%20Developer%20Guide
| Even though Siri proxy is working super well for me, they do say that it is in an alpha state development now. Meaning it does have occasional issues and going through the proxy server, some of the voice commands or functions may not be quite the same/functional. For example the open app command still does work for any of the non-default applications. However it seems to not recognize programs like contacts or music. This also means that when asking to play a particular song or album e.g. "Siri, play album X" the proxy does not recognize this. Saying I do not have that album or artist. All in all, swapping one level of convenience for another. Not too big of a deal. Easily reverted by resetting your Wi-Fi IP. So what's next? Well I've ordered a few more light nodes and those of the most immediately useful to me. I would also like to add some thermostat control, however my house is kind of badly designed for that, making it cost prohibitive. (I have a number of baseboards on independent thermostats in the same room… Stupid) | Troubleshooting:
If encounter a few issues about trying to get Siri proxy up and running, try the following:
I performed these three steps, and Siri proxy consistently runs perfectly. Thanks to Elvis Impersonator for most of these tips!
|
 |
| Woo hoo! |
Also in the process of trying to find a machine I can use for dedicated Siri proxy server. Raspberry_pi is an option, and you can find more about those on Elvis impersonator's page. I have to look into it a bit ourselves first to see if it's the best option for me.
One of my favorite things about the Siri proxy server is, as you see in the video I can unlock my door just by using my voice. As I walk up to my house, I reconnect to my Wi-Fi and the Siri proxy server, all I have to do is tell the door to unlock. Which is really great for me as I can no longer manage keys.
So all in all I found getting this up and running was challenging, but well worth the efforts.

Additional Note (added 29th of July 2013)
be sure to check out the related blogs comparing the desktop installation to using a raspberry pihttp://pikespals.blogspot.ca/2013/06/raspberry-pie-versus-desktop.html
Monday, 18 March 2013
IPhone Jailbreak Fun
 |
| follow my attempts on twitter #setmyiPhonefree |
Here I will give a quick tour of some of the apps I've tried out. Specifically, I'm looking to find ways to improve my access to the phone and any improvements that can be made to Siri was an eye to trying to make it work with my home automation system. But first, for those of you who may not know… What does it mean to jailbreak your iPhone/iPad?
iOS jailbreaking is the process of removing the limitations on Apple devices running the iOS operating system through the use of software and hardware exploits – such devices include the iPhone, iPod touch, iPad, and second generation Apple TV. Jailbreaking allowing the download of additional applications, extensions, and themes that are unavailable through the official Apple App Store. (Source: Wikipedia)
If you would like to give it a try, the process of jail breaking is actually quite simple. Here's the information you'll need:
- life hacker: the always up to date jailbreak guide (these are the steps I followed)
- life hacker: why jail breaking is awesome!
- life hacker: before you do, things to consider… know the risks
Great! Now that that's out of the way, let's talk about some of the cool stuff we found.
Now if this is the beginning, there's an awful lot of stuff to sift through on the Cydia store. Most of it I don't find particularly useful, and a lot of it is out of date (particularly for the new iPhone 5). There is tons of fun stuff like applying seems to your iPhone. Not useful, but entertaining. For example, using the Winterboard app I now have an animated space invaders lock screen. Here's a list of apps I've tried and how useful I found them in coping with the disabilities provided by ALS.
 Octopus Keyboard
This is a keyboard replacement for the standard iPhone keyboard. Essentially it's a straight up ripoff of the keyboard you'll find on blackberries Z-10. Essentially it is an auto complete function built into it, popping up the words over particular keys. To complete the word, simply swipe upwards towards you typing area.
I like this keyboard very much. A substantial improvement over Apple's auto complete function and perhaps the primary reason why I chose to jailbreak my iPhone. That said, with my dexterity limitations the swiping action can be a little bit tricky for me at times. Also I found it seems to work better on the iPhone if I turn off apples AutoCorrect.
Also, I'm not sure that I can attribute this to the octopus keyboard. But I have noticed when I'm creating a little bit of a larger e-mail on my iPhone (usually through a combination of typing and Siri dictation) there is does seem to be a slowdown in responsiveness. I have no problems running it with IOS6. There are also a whole bunch of dictionaries that you can add to the keyboard for free.
|
||
|---|---|---|
Hands Free Control
Does exactly what the title implies. Give you hands-free control to activate Siri. When enabled, you simply have to say the keyword (default is Siri) and if hands-free control is enabled Siri wakes up and waits for your commands.
You can change the activation keyword features a comes preinstalled with five options and a number of customized sounds which are played when it activates or receives a command. You can also add your own custom keyword.
So far I found this works very well and quieter environments. If there is a bunch of background noise, Siri is of course going to have issues recognizing your command (this is also a problem if you're using hands free to play music from your iPhone). It operates in low power mode to minimize strain on your battery. Nonetheless it is no additional cost and you can expect to see a shortened battery life. He does however have an option to only enable when it's on AC power. This is how I use mine, when pluged-in beside the bed at night hands-free is activated.
This is quite useful, but not as much as I'd hoped. I'm looking to be able to tie it into my home automation system. Unfortunately Siri cannot open bookmarks or web links so I cannot fire the command to my vera home automation system at this point in time. I am however looking at running a Siri proxy in my home. If I can figure out how to get this rolling, that will make hands-free jailbreak several levels of pure awesome. I would literally be able to say "Siri, turn on the basement light"…
|
||
Assistant ExtensionsUnfortunately this is not yet compatible with IOS6. I have installed it and it doesn't run and a few things work. For example it will search YouTube just fine through Siri. However using assistant extensions to activate any of the system settings (such as toggle Bluetooth) it crashes the iPhone and reboots in safe mode. It promises additional chat bots, translator, YouTube integration and a few other features. It is also the building block for a number of other Siri plug-ins. Unfortunately none of those will work either until this is patched. But like I said other than YouTube nothing seems to work at this point in time. Here's hoping that when is compatible with IOS6 they will have a whole bunch more features to it. It looks promising…
|
||
Assistant Love
This is another Siri extension which looked extremely promising and unfortunately didn't turn out to be quite as useful as I had hoped. Assistant love adds music integration to spotify and grooveshark allowing you to play from any of these sources as though you would a regular music. Unfortunately, living in Canada these services are not available :-(
However, it also allows you to override the default navigation service. You could replace the Apple maps searched and directions with a number of other services providing you have them installed on your iPhone. For example I've replaced by default navigation voice search with that of Google maps. This is actually pretty cool.
Other than that it does provide a few additional commands to toggle some settings. For example you can use assistant love to toggle Bluetooth/flashlight/Wi-Fi and your audio mode. I have found that being able to toggle the flashlight using hands-free control kind useful in the middle of the night. No messing with the light the bedside table ;-)
All in all, there are some useful functionality within assistant love even without groove shark and spotify and worth the price.
|

So for me, the next step is to look at setting up a Siri proxy. This is far more complicated and if I can get it working it will answer my needs for tying it into my home automation system. I would very much have preferred to use the aliases in assistant love. But will give this a try instead. If I can get this working… Well, check out what can be done with it!
So all in all, there is some very good apps available if you jailbreak your iPhone to help make it more accessible to you. Communicate by phone Joe broken for the time being and continue to look for new apps/functionality. The is also a lot of fun apps to be had, for example check out barrel. A real fun way to turns pages on your home screen.
These also check out some other reviews and writeups on these links. If you're considering jailbreak in, this is a great place to start helping you decide if it's worthwhile or not.
- best apps on Cydia gizmag review
- best jailbreak apps and tweaks life hacker
- make your iPhone read your mind by life hacker.
- jailbreak tweaks for IOS6 Idownloadblog.com
Thursday, 7 March 2013
My New Spoon
This is where caused many explorations into more accessible plates and utensils. Some of which work better than others. Some of which only work for a period of time. I've gone through lots of different cutlery by now and what is commonly accessible to the disabled doesn't really seem to be suiting my correct at this point in time. They seem to be either too large, unbalanced or otherwise unwieldy…
 |
| the people at my rehab facility had said they'd never seen or thought of a design like this |
This spoon is a fairly typical handy accessible spoon which was provided to me by my rehabilitation facility. You can't see it very well and the image that it does have a curve to the left, intended for a right-handed user. Making it easier to get the food in your mouth.
We've modified it by sending down the thickness of the handle quite substantially and by adding the two rings that you can see in the picture. These two rings are simply riveted in place a little loosely allowing me to position them for best alignment to my fingers. We've also added a little soft tape on the inside to just help with spacing. This is a prototype and we are still working out some of the details like where exactly to place the rings. That said, this spoon seems work the best for me at this point in time.
 |
| say hello to my new spoon |
As for other cutlery, the next step is to see how well this works for a fork. Knives are out of the question for me. I require both hands to maintain the spoon study and get into my face.
On a side note, having a disability friendly plate helps immensely. One with a raised edge helps to push the food onto your fork or spoon. I wouldn't say it's required, but it does help prevent the food on your plate for making a break for it.
Stupid, yes. Funny, even more so ;-) |
|---|
Subscribe to:
Posts (Atom)